Umami Bomb Veggie Burger aka Vegan Fake-out Garden Burger™️

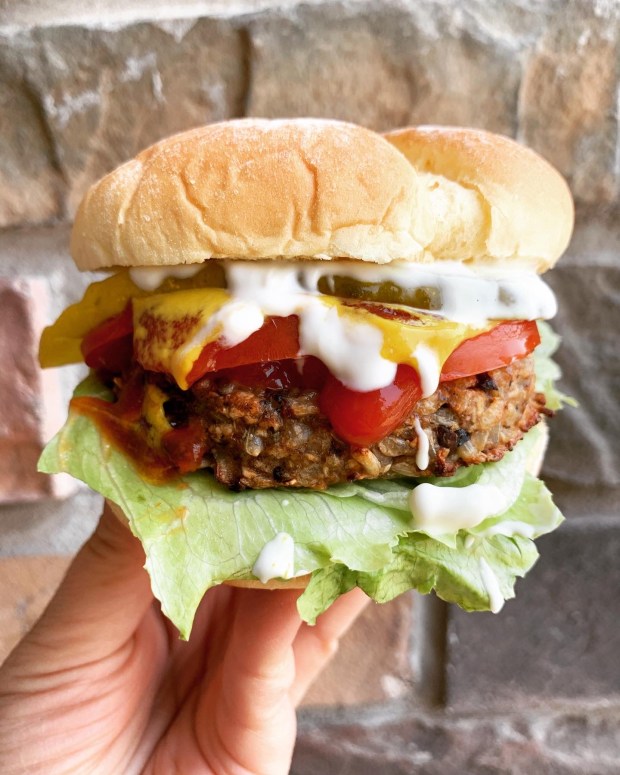
Do you guys remember the old school Garden Burger™️? You know, the one that came onto the food scene when I was a Morrissey worshipping vegetarian in 1992? (Too bad he turned out to be a total racist prick, even though when I touched his hand at a concert, I thought I’d never wash it again!) It was hearty, satisfying and not trying too hard to taste like meat, unlike its counterpart, the Boca Burger™️ that came out the very next year and nearly made me gag at family BBQ’s. Anyways, back to that Garden Burger. I loved it. But it’s not vegan. It’s still around, but it has cheese and some other weird additives and preservatives in it. Well, I’ve been craving it and seeing as how I’m currently trying to follow McDougall’s “Starch Solution” for Crohn’s disease, I thought I’d make it according to protocol. You’re going to love it. It’s the hearty, tasty, filling, vegan burger that’s not trying to be meat and that won’t fall apart on your grill or in your skillet. Plus it’s gluten-free! TBH I air fried the one in this post and it was so damn delicious. Here you go.

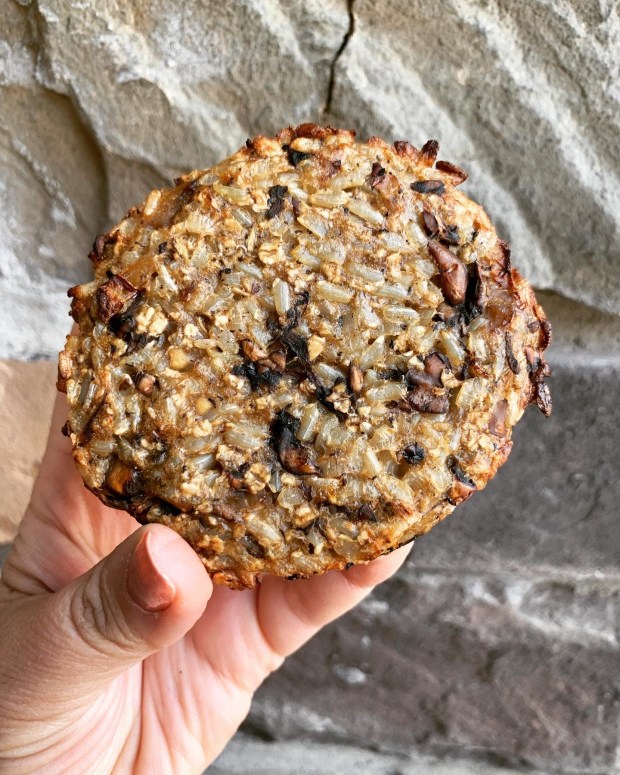
Umami Bomb Veggie Burgers

Aka: vegan fake-out Garden Burgers

  • 4 cups cooked long grain brown rice (or about 1 1/2 cups long grain brown rice cooked in 3 cups of tasty vegetable broth)
  • 16 ounces button mushrooms, finely diced
  • 1 large finely diced onion
  • 2 cloves garlic, minced
  • 1 1/2 teaspoons sea salt
  • 1/2 teaspoon ground black pepper
  • 1 cup quick or rolled oats
  • 2 tablespoons Tamari (or coconut aminos for soy-free)
  • 2 tablespoons nutritional yeast
  • 1 tablespoon psyllium husk powder (used as a binder, see notes below for substitutions)

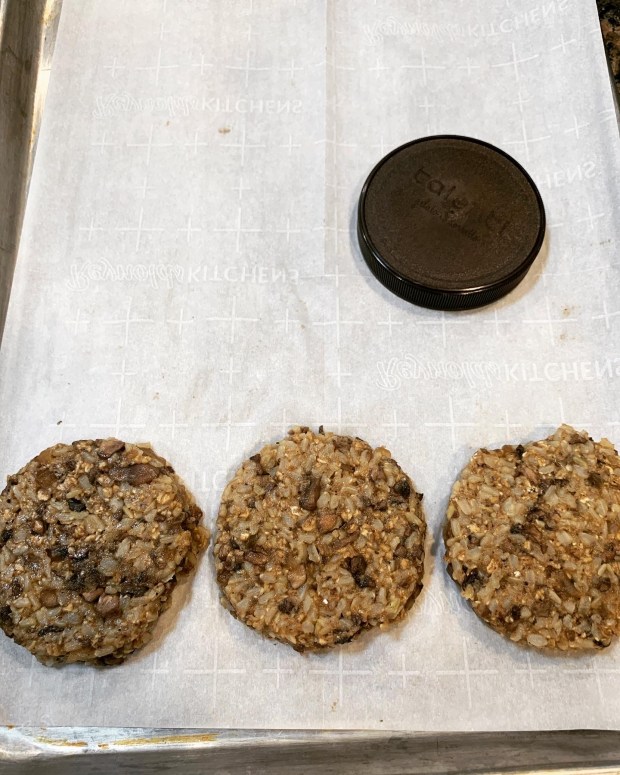
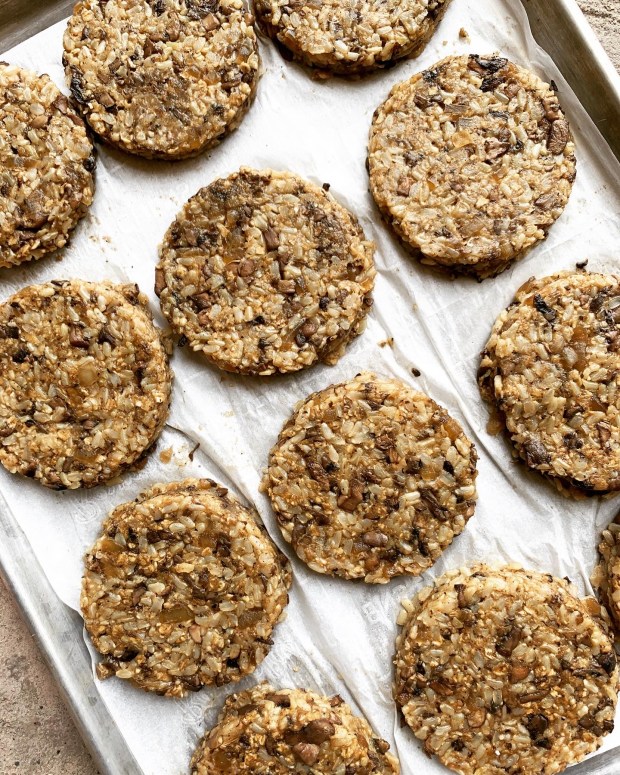
Method: In a large skillet, dry fry the onion until it starts to release all its liquid. Stir and add the mushrooms. Cook the onions and mushrooms until they’re mostly dry. Add the garlic, salt, pepper, tamari, and the nutritional yeast. Turn off the heat. Add the oats, then the brown rice. Make sure at this point the burgers are seasoned to your taste/adjust seasonings if necessary. Next. sprinkle the psyllium husk powder evenly over everything and quickly stir to thoroughly combine. On a large baking sheet lined with parchment paper, use a slightly heaped 1/2 cup measure to portion out the burgers. Shape with a peanut butter lid/wide mouth mason jar lid/or a Talenti™️ sorbetto lid (like I did) into thick burger shapes by pressing the lid onto the portioned burgers until nicely shaped. Even though these burgers are oil-free, they shouldn’t stick to the lid or measuring cup too badly. Next, either cook in a nonstick or seasoned cast iron skillet/or grill/air fry immediately, or freeze formed burgers in between sheets of parchment paper and cook up to 3 months later directly from frozen. Cook 3-4 minutes per side if fresh, 4-5 minutes per side if frozen, or about 10 min in the air fryer at its hottest temp (watch so it doesn’t burn). Makes 10-12 big veggie burgers.

Notes: if you don’t have psyllium husk powder, I highly recommend it. It’s a great binder made from natural psyllium. In lieu of psyllium you could try 2 tablespoons of ground flax seed or ground chia seeds mixed with 1/4 cup warm water, but I haven’t tried it and I can’t guarantee the burgers won’t fall apart. This recipe can easily be halved if you prefer 5-6 burgers instead of 10-12.

A Week of Nourish Bowl Ideas for Veganuary

It’s Veganuary and I’d love nothing more than to help people to figure out how to eat more meatless meals. Here’s my simple “nourish bowls” meal plan for the coming week if anyone wants to follow along. Some of these meals can be made using canned/frozen/prepared foods for easier/faster meal prep. None of them should take more than an hour total for prep (most 30 min or less).

Basics ingredients for the bowls are listed below, if you need more complete recipes/ideas click through to this printable meal plan for the week:

https://docs.google.com/document/d/10-Zs71iOsqdUorH5s2fNFCQtFbD-_SsMu0fQ6sQCk9Q

Burrito bowls

Salsa

Spanish Rice

Smoky Pinto Beans

Lettuce, tomato, cilantro, avocado

Creamy cilantro dressing

Crushed corn chips

Chopped Greek salad bowls

Cucumber

Grape Tomatoes

Garbanzos

Red Onion

Chopped lettuce

Greek Dressing

Vegan Feta

Vietnamese bowls

Cold Rice noodles

Shredded carrot & daikon doused with seasoned rice vinegar

Sliced cucumbers

Crispy tofus

Lightly Sweetened Coconut cream

Cilantro

Sweet soy dressing

Crispy onions

Crispy potato & turky bowls

Air fried cubed potatoes

Packaged Gardien turky cutlets and gravy

Steamed broccoli & baby carrots

Sweet corn

Chikn Satay bowls

Soy curls, hydrated in strong veg broth and tossed in cornstarch/lightly fried in a wee bit of oil

Sautéed Red & green bell pepper strips

Sautéed Onion strips

Shredded carrots, scallions, cilantro

Brown rice

Peanut sauce

Spaghetti bowls

Spaghetti

Marinara sauce

Vegan meatballs

Fresh parsley

Vegan parm

All tossed and bowled

Deconstructed sushi bowls

brown rice doused with seasoned rice vinegar

Crispy tofus in sweet teriyaki sauce

Nori strips

Shredded carrot & cucumber

Avocado cubes

Crispy Fried onions

Sriracha Mayo (vegan mayo + sriracha)

I’m the sort of girl that mostly cooks without recipes, but here’s that link again to the full recipes/ideas/printable meal plan if you need more help:

https://docs.google.com/document/d/10-Zs71iOsqdUorH5s2fNFCQtFbD-_SsMu0fQ6sQCk9Q

Instant Pot BBQ Banana Peel Sandwich AKA TRASH SANDWICH

TRASH SANDWICH. Ok ok ok. I have been making fun of the banana peel trend for weeks on end now. Basically laughing at any and every vegan who is dumb enough to eat banana peels. Then my friend Amanda posted a BBQ banana peel sandwich on Instagram that pushed me over the edge, cause that girl def don’t mess around with gross food. Drum roll: I HATE that I love it. It’s incredibly weird and incredibly good. I don’t know what else to say. So I made this blog post. Try it if you dare.

Edit: I do not recommend whatever recipes are floating around with a million views. Banana peels def need more than just a quick jaunt in a skillet with some seasonings. Otherwise, IMHO they will be disgusting and bitter and have a super nasty texture.

Instant Pot Banana Peel BBQ Sandwiches

  • 4-6 slightly spotty banana peels, washed thoroughly, stems removed, the rest shredded finely (like pulled pork) with the tines of a small fork. No need to remove the pithy interior. Make sure to use the innards in a smoothie or in banana bread!
  • 1 finely sliced sweet onion
  • 1 finely sliced red bell pepper
  • 8 oz very finely sliced mushrooms
  • 2 tablespoons molasses
  • 3 tablespoons soy sauce, Bragg’s Liquid Aminos or tamari
  • 1 tablespoon balsamic vinegar 
  • 1 tablespoon pure maple syrup
  • 1 clove minced garlic
  • 1 teaspoon fresh minced ginger
  • 1 teaspoon to 1 tablespoon liquid smoke
  • 1 tablespoon hot sauce (I used Frank’s Red Hot)
  • 1/2 cup water
  • 1/4 teaspoon ground black pepper
  • 1/2 cup organic ketchup (reserve!)
  • Vegan butter (optional, 2-4 tablespoons)

Add everything except the ketchup and the optional vegan butter to the instant pot. Pressure cook on high for 30 minutes instant release. After releasing pressure, add the ketchup and if desired (for a more realistic mouthfeel, add the vegan butter). Turn the instant pot sauté function on. Allow to cook with for another 5-10 minutes, or until most of the liquid is absorbed stirring often so the bottom doesn’t burn. Season with salt and pepper to taste. Serves 4.

I served mine on toasted French bread with banana peppers and vegan mayo.

Easy Vegan Peanut Butter Cookies

I’ve been making these babies for a few weeks now trying to get the recipe perfect! They’re finally ready to share with you. You don’t need a stand mixer or electric mixers to make these, they come together super quick and easy just stirred with a fork/spoon. Enjoy!

Easy Vegan Peanut Butter Cookies

  • 1/4 cup safflower oil (or other neutral oil)
  • 3/4 cup peanut butter
  • 1 cup packed brown sugar
  • 1/4 cup plant milk
  • 1/2 teaspoon baking soda
  • 1/2 teaspoon baking powder
  • 1 teaspoon sea salt
  • 1 teaspoon vanilla
  • 1 1/2 cups to 1 3/4 cups all purpose or gluten free flour

Method: Preheat oven to 375 degrees. In a medium bowl add the oil and the peanut butter. Stir with a fork or spoon until combined. Add brown sugar, stir again. Add the plant milk, baking soda, baking powder, sea salt and vanilla, stir again. Add the flour, starting with 1 1/2 cups using the spoon and level method. If the dough seems too soft or if you’re using natural peanut butter, add flour, 1 tablespoon at a time up to the additional 1/4 cup until the dough is the right texture (not too soft, not too dry). Spoon out onto baking sheets by rounded tablespoons. Press each cookie down with the tines of a fork to make the classic PB cookie pattern. Bake for 8-10 minutes for softer cookies, 12-14 minutes for crispier cookies.

Makes 30-34 cookies. The cookies pictured were cooked for just 10 minutes. For cookies that stay soft, put in an airtight container immediately after cookies are cooled off.

Vegan Chocolate Chip Zucchini Bread (with a special sugary crust)

Years and years ago before I went vegan, a lovely neighbor brought me the most delicious chocolate chip zucchini bread. The loaf had an extraordinary sugary crust that gave the slices a satisfying crunch on the edges.

Naturally, I begged her for the recipe. I’ve revamped it here to make it vegan, as well as significantly reducing the sugar and fat content, however I wouldn’t go as far as to classify this as “health food.” Regardless, it still tastes delightfully indulgent and it’s a wonderful way to use up any surplus of zucchini you may have.

Feel free to omit the chocolate chips or add nuts to make this recipe more to your personal liking. Don’t hesitate to fight for the end pieces.

Vegan Chocolate Chip Zucchini Bread

  • 3 cups organic unbleached all purpose flour. To make this loaf gluten-free, use a gluten-free cup for cup replacement flour plus 1 teaspoon xanthan gum
  • 1 tablespoon ground cinnamon
  • 1 tablespoon baking powder
  • 1 teaspoon sea salt
  • 1/2 cup organic sugar
  • 1/2 cup organic light brown sugar, firmly packed
  • 2 cups grated zucchini
  • 1/2 cup aquafaba
  • 1/2 cup safflower or other neutral vegetable oil
  • 1/2 cup unsweetened organic applesauce
  • 1 tablespoon vanilla extract
  • 1 cup vegan fair trade chocolate chips

Method: Preheat the oven to 325 degrees. Sift the flour into a large mixing bowl. Add the cinnamon, baking powder, salt, sugar and brown sugar. Combine all the ingredients with a wire whisk. Add the zucchini to the bowl and toss in the flour mixture until evenly distributed. Add the aquafaba, safflower oil, applesauce and vanilla. Stir until everything is well incorporated but do not over mix. Fold in the chocolate chips.

Take two 8×4 loaf tins and generously grease them with vegan butter. Add two heaped tablespoons of sugar to each loaf tin. Tilt the tins to evenly dust the sugar around to the entire interior of the tins. Gently tap out any excess sugar into the sink. Scoop batter into the sugared loaf tins, evenly distributing between the two loaves.

Bake for 60 to 70 minutes until loaves are deeply golden and a toothpick inserted into the center comes out clean. Let loaves cool for a couple of minutes in their tins before running a butter knife along the edges to carefully loosen the loaves prior to turning out onto a wire rack to further cool prior to serving. If the bread feels like it might stick, use the knife as a lever gently along the bottom edges too.

Makes 2 loaves.

Ultra Tasty Vegan Naan

I’ve been almost entirely gluten-free as of late due to autoimmune issues, but I had company over for dinner tonight and wanted to make something to impress with ingredients I had on hand. I made a lovely Chana Masala with some basmati rice and came up with this ultra tasty vegan naan. After several recipe requests through Instagram, I decided to put the recipe up on my site. Here you go!

Ultra Tasty Vegan Naan

(Makes 16 Naan, recipe can be halved)

• 1.5 cups warm water

• 1 heaped teaspoon sugar

• 2 teaspoons pink salt

• 1 tablespoon instant yeast

• 1.5 teaspoons baking powder

• 1/2 cup soymilk combined with 1 tablespoon fresh lemon juice (let set for 5 minutes)

• 1/4 cup extra virgin olive oil

• 4.5 – 5 cups unbleached all-purpose flour (scoop and level)

• Melted vegan butter, mixed with several cloves of fresh minced garlic. Plus black onion seeds (kalonji) for topping naan after cooking

Method: in a kneading apparatus (or use a large bowl and spoon and then your hands) add water, sugar, salt and yeast. Mix to combine. Then add baking powder, soymilk mixture, and olive oil. Mix again. Add the flour and mix until roughly combined. Add the additional 1/2 cup flour if dough is too wet and sticky. Then knead for 10 minutes or until dough is smooth and elastic. This is a soft dough.

Cover and let dough rest for one hour. Then punch down and divide into 16 pieces. Use a floured surface to shape each piece into a teardrop shape with your hands.

Heat a cast iron or griddle type skillet over medium high heat. Once skillet is quite hot, brush with a bit of olive oil. Cook until naan is puffed and brown on one side, then flip and let brown on the other side. Repeat until all naan are cooked.

Brush warm naan with melted vegan garlic butter. Then sprinkle with the black onion seeds (if desired). Serve warm.

Microwave Coconut Bacon

I didn’t want to heat up my house today so I made my old standby coconut bacon recipe, but in the microwave. Thought you might like to try it too. It takes less than 3 minutes total to make.

Microwave Coconut Bacon

  • 1 tablespoon soy sauce, tamari (gluten-free) or coconut aminos (soy-free)
  • 1 teaspoon pure maple syrup
  • 1/2 teaspoon apple cider vinegar
  • 1/4 teaspoon smoked paprika
  • 1/2 teaspoon liquid smoke
  • 1/4 teaspoon ground black pepper
  • 1 cup large coconut flakes

Method: Add the soy sauce (or substitute), maple syrup, vinegar, paprika, liquid smoke and pepper to a cereal sized bowl. Give the mixture a quick whisk. Add the coconut flakes and stir to coat evenly with the liquid marinade. Put in the microwave, cook for 30 seconds, remove and stir. Repeat, except at 15 second microwave intervals, stirring each time, until the coconut bacon is toasty. My coconut bacon took about 1 minute and 30 seconds total in a 1000 watt microwave. Use caution as bowl will be hot. Do not over-cook as it will definitely burn. Coconut bacon will crisp up as it cools. If you don’t have a microwave, you can double this recipe and cook in the oven at 375 on a baking sheet for 10 minutes, stirring at least once halfway through. Again, watch carefully so it doesn’t burn

Sprinkle on everything.

Love, Somer

Vegan and Gluten-Free Crusty Olive Oil Sourdough Peasant Bread

About a month ago, I made a gluten-free bread recipe by Dan Lepard that sort of blew my mind. I’d never made gluten-free bread that rose so well -IT DOUBLED! I’d also been used to baking gluten-free bread dough that looked more like quick bread batter. This dough was sturdy! Shapeable! Dare I say: “fairly similar to gluten dough?” The secret to this bread lies in the psyllium husks and ground flax, both have rad “binding” abilities which gives the bread amazing structure like the gluten proteins in regular flour do.

The bread also had such a delicious crispy crust without tasting like cardboard. However, due to some unknown cause, my first attempt had a slightly gummy interior, I suspect I didn’t bake it long enough or that altitude played a role there. I sent my mom the recipe and she made the loaf on the same day with better success than I had. Regardless, we both agreed on one thing: we needed a sourdough version and a stronger flavor profile.

My loaf:

My mom’s loaf:

We both kept playing with the recipe and last week during spring break at her house, we had a break through.

Sliced:

Toasted and half eaten:

Over the process of the last year, my mom had converted her positively ancient sourdough starter into a gluten-free starter. We made a seeded sourdough version of the bread and the results were brilliant, full bodied and full flavored. However her crust didn’t brown very well and the bread still didn’t contain any whole grains. So, when I got home I resolved to improve on the recipe even further.

Raised in a proofing basket:

I tested and tested and then tested again until I had a crusty brown sourdough loaf that crunched like artisan bread, was decidedly not of the cardboard variety and had some whole grain flour in it.

Many thanks to Dan Lepard for his original recipe that my mom and I used as a springboard. Our collaborative adaptation on his bread is printed below with his permission.

Vegan and Gluten-Free Crusty Olive Oil Sourdough Peasant Bread

Makes 1 very large delicious loaf

Adapted from Dan Lepard’s wonderful Gluten-Free Bread recipe here

Ingredients:

Method:

1- Preheat the oven to 450 degrees. Put a pizza stone or stoneware baking sheet in the oven and allow it to heat while the oven heats up. In a bread maker, stand mixer, or other kneading apparatus (maybe a big ol’ bowl if you’re going to be kneading with your hands) add the water, sugar, salt and yeast. Give the liquid a quick stir, then mix in the “proper” sourdough start or the “faker” sourdough start. In a separate large mixing bowl thoroughly whisk together the cornstarch, brown rice flour, psyllium husks and the ground golden flax seeds. Pour the flour mixture into the now bubbly yeast mixture. Immediately add the olive oil and mix well to make a smooth thick batter.

2- Knead for 5-10 minutes until dough is uniform and gluten bread dough like, then cover with a clean cloth and leave for 20-30 minutes, or until doubled in size.

3- Line a baking tray with parchment paper. Sprinkle a small handful of cornmeal onto the paper. Place the dough on the cornmeal and carefully roll and shape the dough into a fat sausage, about the length of the tray, making sure the loaf is nicely and evenly covered with the cornmeal. Using a sharp serrated knife, make several diagonal slash marks across the top of the loaf. Cover with a clean cloth and leave to rise in a warm place for 20 to 30 minutes, or until nearly doubled again.

4- Carefully lift the loaf WITH parchment paper off the baking tray and transfer to the preheated clay baking sheet or pizza stone. Do not burn yourself! Bake for about 50-55 minutes, or until the loaf is a very deep golden-brown in color all over, indeed, it may even look slightly burnt. But I promise the crust will be super delicious. Brush with extra virgin olive oil (if desired, because it really makes it taste so good) and leave to cool on a wire rack before slicing.

p.s. Try not to eat the whole loaf by yourself at once: psyllium husks and flax seeds are necessary for the structure in this loaf, but they’re also known for their unparalleled ability to get the digestive system moving…

Mom’s French toast made with this bread:

To make your own gluten-free sourdough start, you can use the recipe below. To make my starter, I used 1 cup of “cup for cup gluten-free flour” with an equal amount of water. Then followed the rest of the ingredient list and directions in the link. I had brilliant results.

http://redstaryeast.com/gluten-free-sourdough-starter/

Truffled Macadamia Nut Brie

This recipe is an update to my

Macadamia Nut Brie En Croute

Method: blend the macadamia nuts, water, nutritional yeast, maple syrup, miso, tahini, rice vinegar, Dijon mustard, salt, ground white pepper, vegan butter and truffle oil (or use truffled salt) on high speed until completely smooth and creamy, about 4 minutes. Add the tapioca flour and kappa carrageenan. Blend again for 20-30 seconds more. If mixture has any grittiness, pour through a fine sieve or cheesecloth to remove any bigger particles.

Pour mixture into a medium saucepan and cook over medium heat, while stirring constantly for 9 minutes (please time it!) Pour mixture into a 2 cup round mold lined with plastic wrap (for easy removal). Cheese should start to set immediately. Let set for 1-2 hours at room temperature, remove from mold, put on a small plate and transfer to the fridge uncovered (this helps it form a crust). After 2-3 hours of refrigeration, cheese can be dusted with tapioca flour (if desired) for a more “brie like” appearance.

Brie can be served on a cheese board with an assortment of accruements or topped with a cranberry sauce and wrapped in puff pastry for a baked brie en croute (instructions here). It melts beautifully and can be served on sandwiches, pizza, etc.

Note: this recipe is very rich and has a bold macadamia nut flavor. Cashews can be used for a milder taste.

Dad’s Wild Rice, Cranberry and Pine Nut Stuffing

Dad’s Wild Rice, Cranberry and Pine Nut Stuffing

  • 10 cups cubed and dried vegan bread (can be gluten free)
  • 5 cups vegetable broth
  • 2 white or yellow onions chopped fine
  • 6 celery stalks cut into small pieces
  • 1 tablespoon dried thyme
  • 1 tablespoon dried oregano
  • 1 tablespoon dried sage
  • 1 tablespoon onion powder
  • 1 tablespoon garlic powder
  • 1 tablespoon sea salt
  • 1 pound fresh mushrooms sliced
  • 1 cup cooked wild rice (instructions below)
  • 1 cup shelled pine nuts
  • 2 shots vegan worcestershire sauce
  • 1/4 cup vegan butter
  • 1 cup dried cranberries

Method: Preheat oven to 200 degrees. Boil wild rice with water according to package directions until tender (about 40 minutes). Sauté onions, mushrooms, celery and seasonings in the vegan butter. Sauté pine nuts separately in a little bit of vegan butter until golden brown. Mix all ingredients in a large pan adding vegetable broth as you stir it in. Test for consistency and add more broth if too dry. Fluff with a large fork. Bake on low heat for ½ for an hour or longer.

Makes 20 servings. Sure to please even the stuffing haters.